Chocolate Cobbler

Tuesday, February 7, 2017

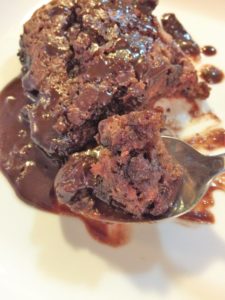
Chocolate Cobbler… um, yes please!  You had me at chocolate!  I haven’t had a dessert this decadent and wonderful in a very long time.  Imagine the most perfect chocolate pie filling with yummy chocolate cake on top.  How could you possibly go wrong here?!?!  It’s heavenly!  It’s like a magical lava cake… sink your spoon into that amazing cakey goodness (because a fork won’t do) and just swoon over the river of chocolate that appears out of nowhere.  Eat that Chocolate Cobbler like no one’s watching; lick the spoon; lick the plate – hey, no one’s watching, so who cares!  Then go for seconds, because seconds are a must!  Happy Tuesday, everyone!

Chocolate Cobbler

Ingredients:

6 tablespoons butter, melted
1-3/4 cups sugar, divided
1 cup flour
1-1/2 teaspoons baking powder
1/2 teaspoon salt
1/2 cup whole milk
6 tablespoons unsweetened cocoa powder, divided
1 teaspoon vanilla extract
1 cup mini chocolate chips
1-1/2 cups boiling water

Instructions:

Preheat oven to 350 degrees.  In a medium bowl, whisk together 3/4 cup sugar, flour, baking powder, salt, milk, 2 tablespoons cocoa powder and vanilla.

Pour melted butter into an 8×8 inch pan.  Pour batter over melted butter.

In a separate bowl, combine the remaining 1 cup of sugar, 4 tablespoons cocoa powder and chocolate chips.  Sprinkle evenly over the batter.

Slowly pour boiling water over top of the cobbler.

Bake 40 to 45 minutes, until top of the cobbler looks set.  Do not over bake; you’ll miss out on the chocolate sauce.  Enjoy!

(Recipe Source:  Plain Chicken)

Tawnya

Southern Style Cabbage

Saturday, January 21, 2017

I am desperately trying to remember when I tried cabbage for the first time; I know my Mom made me do it.  Most definitely wasn’t in my younger days, though.  Anything considered even remotely healthy was probably not on my plate – unless, of course, it was swimming in ranch dressing.  I don’t know how my Mom persuaded me to try it.  I’m sure it took a lot of convincing on her part, since I was certain anything green would kill me.  I’m happy to say I survived my first cabbage encounter; my Mom was right again!  The ingredients in her Sweet Cabbage recipe were simple – water, sugar, salt and pepper, and tons of butter.  A bowl of her buttery, sweet cabbage and a mega slice of cornbread was a meal in itself.  But even my Mom’s Sweet Cabbage recipe and the fact that I lived to tell this tale wasn’t enough to get my kids to try cabbage.  Then, I found this… Southern Style Cabbage.  A cabbage recipe kicked up a notch or two – a show stopper.  And, according to my kids, good enough to eat!  You have to try it; you won’t make cabbage the old way again.  I’m convinced!  Happy Saturday, everyone!

Southern Style Cabbage

Ingredients:

1 head of cabbage
2 tablespoons butter
2 tablespoons olive oil
1/2 teaspoon salt
1/2 teaspoon seasoned salt
Pepper
2 cups chicken broth

Instructions:

Cut cabbage into quarters, removing the hard stem.  Slice each quarter into 1 inch wide strips.

Add all ingredients to a large pot and stir to combine.  Bring to a boil over medium-high heat.  Cover and reduce heat to medium- low.  Simmer for 12-15 minutes, stirring occasionally until cabbage is tender.  Enjoy!

(Recipe Source:  Divas Can Cook)

Tawnya

Crockpot Country Style Ribs

Sunday, January 1, 2017

Happy New Year, everyone!  I hope your day has been filled with tons of fun and celebration!  Did you eat until you were miserable, like I did?  I may never eat again!  We stuck with tradition and had Black Eyed Peas and Sweet Cornbread and Southern Cabbage.  I’ll share that Southern Cabbage recipe with you later; it’s a show stopper!  We didn’t stop there, though…  We had Southern Style Baked Beans and My Mom’s Broccoli and Rice Casserole.  And now for the real reason I’m writing today, Crockpot Country Style Ribs.  They were delicious and so easy to make; they cooked while I slept.  You just can’t beat that!  This might be the start of a new New Year’s tradition.  Speaking of traditions, I was taught to leave three peas on my plate for good luck.  I do this every year – wishing and hoping.  I would love to hear about your traditions!  Here’s to a fabulous 2017 filled with fun and family and infinite joy and happiness – and who knows, maybe a little luck, too.  🙂  I have a feeling it’s going to be wonderful!

Crockpot Country Style Ribs

Ingredients:

Package of 12 Country Style Ribs
1 teaspoon salt
2 teaspoons black pepper
1 teaspoon smoked paprika
Bottle of your favorite barbecue sauce (Sweet Baby Rays is fabulous!)
Roasting pan

Instructions:

Spray the inside of your slow cooker with nonstick spray.  Mix salt, pepper, and smoked paprika and rub mixture onto ribs.  Lay half the ribs into slow cooker and drizzle with barbecue sauce.  Repeat with remaining ribs.  Cook 10 hours on low.

Set oven to broil.  Carefully remove ribs from crockpot and place in a roasting pan.  Drizzle with barbecue sauce and place in oven for about 3 minutes to caramelize sauce.  Enjoy!

Tawnya

Chocolate Peanut Butter Bars

Saturday, December 31, 2016

Chocolate Peanut Butter Bars…  also known as Incredibles.  I am in total love with these chocolatey, peanut buttery bars of pure wonder.  Trust me, they ARE incredible.  The recipe makes a ton and I eat most of them without a care in the world.  The two in the picture are all that’s left of the batch I just made.  My friend gave me this recipe.  She brought them in a beautiful Christmas tin to share at work.  I couldn’t stay out of that Christmas tin.  The lid clanked every time I opened it, so there was no sneaking around, but she didn’t mind.  The following year for Christmas she gave me a beautiful Christmas plate with my own batch of Incredibles, recipe included.  She totally gets me… 🙂  Happy Saturday, everyone!

Chocolate Peanut Butter Bars… Incredibles

Ingredients:

1 package Graham Crackers, finely crushed
3 cups powdered sugar
3/4 cup butter, softened
1-1/2 cups peanut butter
12 ounce package milk chocolate chips

Instructions:

Mix first 4 ingredients until well combined and press into a 9×13″ pan.  Melt chocolate chips and pour over peanut butter mixture.  Let cool until chocolate sets.  Cut into squares and serve.  Enjoy!

Tawnya

P.S.  Couldn’t possibly post this without including this picture.  Loving this fabulous heart that appeared in my chocolate layer.  Best day ever!!

Restaurant Style Mexican Rice

Friday, December 30, 2016

For dinner last night, we had My Mom’s Chili Enchiladas and they were fantastic.  I mean, it is my Mom’s recipe after all. 🙂  But, let’s talk about this Mexican Rice, shall we?  It’s kind of awesome!  I am a huge fan of restaurant style Mexican rice.  In fact, years ago there was a Mexican food restaurant in our small town that had THE BEST rice known to man.  Many, many times after work I walked in and ordered a large container of rice to go.  Nothing else, just rice.  It was that good!  My girls and I would sit down with forks and just devour that rice straight from the container.  We couldn’t resist and I am not ashamed!  🙂  I ordered it so often, the employees no longer had to take my order.  When I walked in, they disappeared to the kitchen and returned with rice just for me and my girls.  I miss it!  I never thought I’d come across a Mexican rice recipe that I could make at home and enjoy just as much.  But I did and I’m super excited!  I know you’ll enjoy it, too!  Happy Friday, everyone!

Restaurant Style Mexican Rice

Ingredients:

3 tablespoons vegetable oil
1 cup long grain rice, uncooked
1 teaspoon fresh minced garlic
1/2 teaspoon kosher salt
1/2 teaspoon cumin
1/2 cup tomato sauce
1 (14 ounce) can chicken broth

Instructions:

Heat oil in a large saucepan over medium heat.

Add the rice and gently stir until rice begins to lightly brown.

Add the garlic, salt, and cumin and stir the rice until it looks golden.

Add the tomato sauce and chicken broth and turn the heat up to medium high.

Bring the mix to a boil, then turn the heat to low and cover the pan with a lid.

Simmer for 20 to 25 minutes.  Remove from heat and fluff with a fork.  Enjoy!

(Recipe Source:  Favorite Family Recipes)

Tawnya

Homemade Vanilla Ice Cream

Thursday, December 29, 2016

Would you believe it if I told you our air conditioner just kicked on?  No kidding!  So… what do you do on a warm December day in Texas?  You plug in your Christmas lights and then make Homemade Vanilla Ice Cream, of course! 🙂  That’s what we did today and it was fun and fabulous!  A few days ago, we were making warm peppermint cappuccinos and today we’re making Root Beer Floats.  Only in Texas!  I love this Homemade Vanilla Ice Cream.  It takes me back to my childhood when my entire family got together regularly for homemade ice cream parties.  Those were ALWAYS the best times but, I have to say, there is one particular time I remember very well. 🙂  My Mom came across a recipe for an ice cream topping – one that took days to develop – a progressive recipe.  On day one, she added the starter ingredients to a container and added different ingredients on day two, etc.  On ice cream day, she was so excited to open the container and share that beautiful, red ice cream topping with everyone.  So she took the lid off and almost immediately an unmistakable smell permeated the kitchen and everyone fell silent…  That beautiful, red ice cream topping that took days to make had clearly fermented.  And things like that didn’t happen in my Mom’s sweet, Southern kitchen. 🙂  Enjoy this warm December day, everyone!

Homemade Vanilla Ice Cream

Ingredients:

(This recipe is for a 2 quart ice cream maker.)

2 eggs
1-1/8 cup sugar
2-1/2 cups milk
2 cups heavy whipping cream
2-1/4 teaspoons vanilla
1/4 teaspoon salt

Instructions:

Mix eggs until frothy.  Add sugar and mix well.  Add remaining ingredients and mix well.  Add mixture to ice cream maker.  Proceed according to the directions for your ice cream maker.  Enjoy!

Tawnya

Shortbread Cookies

December 22, 2016

I’m pretty sure these Shortbread Cookies were made for dunking.  I’m thinking they were meant to be dunked in hot chocolate… with whipped cream.  Or maybe dunked in frosting… even better!  There is something about these cookies.  Every time I pass that cute little snowman plate, I grab one.  The ingredients are so simple but, I don’t know, they’re just addictive.  The flavor is light, so they’re perfect for decorating with a yummy frosting and they’d make the cutest Christmas cookies!  Perfect for Santa!  Better put some hot chocolate on the side, though.  I have a feeling Santa will dunk them, too. 🙂  Happy Thursday, everyone!

Shortbread Cookies

Ingredients for cookies:

2 sticks of butter, softened
1/2 cup powdered sugar
2 cups all-purpose flour

Ingredients for topping:

1/2 cup sugar
1 heaping tablespoon cinnamon
3 tablespoons melted butter

Instructions for cookies:

Preheat oven to 350 degrees.  Line two baking sheets with parchment paper.

In a large bowl, cream together butter and sugar.  Add flour and continue to mix until mixture forms a soft dough.  Form dough into a cohesive ball with your hands.

Roll dough 1/4 inch thick on a surface dusted with powdered sugar with a well dusted rolling pin.  Cut into rounds and place on prepared baking sheets.  Bake for 16-18 minutes or until cookies are pale golden brown.

Meanwhile, in a small bowl, melt 3 tablespoons of butter.  In a separate bowl, mix sugar and cinnamon.  When cookies are done, remove from oven and brush tops with melted butter and sprinkle cinnamon sugar mixture on each cookie.  (Store leftover cinnamon sugar mixture in a jar.)

(Adapted from The Comfort of Cooking)

Note:  I added the step for topping cookies with butter and cinnamon sugar – Kylee’s amazing idea!  Also, I sprinkled a little powdered sugar on top, because powdered sugar is awesome!  🙂  Enjoy!

Tawnya

Sticky Buns for Breakfast

December 21, 2016

I’m pretty sure I could have Sticky Buns for breakfast every day of the week.  Let me just say, sticky is the key word here and that’s what makes them kind of fabulous.  You know I like to keep things casual and simple around my kitchen, especially for breakfast.  These are super simple to make and the end result is this decadent, sticky pan of wonderful.  Put this in your stash of Christmas recipes; it’s perfect for Christmas morning! They are so quick and you can hurry back to the beautiful joy of Christmas morning with your family.  Nothing better!   Y’all enjoy!  Happy countdown to Christmas!  Have a super great Wednesday, everyone!

Stick Buns for Breakfast

Ingredients:

1 tube of Pillsbury Grands buttermilk biscuits
3 tablespoons butter, melted
1/2 cup pancake syrup
1/3 cup packed light brown sugar
1/2 teaspoon cinnamon
1/4 cup chopped pecans, optional
1/4 cup chopped almonds, optional

Instructions:

Spray a fluted pan with non-stick spray.  Combine the melted butter and syrup in a small bowl and set aside.  In another bowl, combine the brown sugar, cinnamon, and nuts (if desired).  Place about half of the syrup mixture in the bottom of the pan.  Then sprinkle half of the brown sugar mixture on top.  Lay the biscuits on the bottom of the pan, overlapping edges, to form a ring.  Top with remaining syrup and sugar mixture.  Bake at 375 degrees for approximately 20-25 minutes or until golden brown.  Cool for 1 minute in the pan, then invert onto a serving platter.

(Recipe Source:  Stamps4Fun)

Tawnya

Buttermilk Vanilla Cake

December 20, 2016

Let them eat cake!  No more wonderful words have ever been spoken.  I happen to be hooked on cake…and frosting – lots and lots of frosting.  It doesn’t get much better than this Buttermilk Vanilla Cake.  I wish you could have been here while it was baking.  My kitchen smelled heavenly.  And shall we talk about the frosting?  Of course I had to taste it; that goes without saying.  A spoonful here, a spoonful there.  I wasn’t the only one, though.  I have to call out Bryan, my partner in crime.  I would have never known he was sneaking frosting, but there was a little smidge on his nose.  🙂  Dead give away!  Make this cake first chance you get.  You’ll be glad you did!  Don’t eat all the frosting, though.  Save a little for the cake. 🙂  Happy Tuesday, everyone!

Buttermilk Vanilla Cake

Cake Ingredients:

1/2 cup unsalted butter
1 cup sugar
2 large eggs
2 cups unbleached cake flour
3 teaspoons baking powder
1 teaspoon sea salt
1-1/4 cup buttermilk
2 teaspoons vanilla

Frosting Ingredients:

1-1/2 cups unsalted butter, softened
6 cups powdered sugar
1 teaspoon vanilla
2 teaspoons buttermilk

Instructions for Cake:

Preheat oven to 375 degrees.  Cream butter and sugar.  Add eggs.  Mix flour, baking powder and salt.  Gradually add dry ingredients to wet while alternately adding buttermilk.  Mix in vanilla.  Divide batter between two 8 inch cake pans that have been generously greased with butter or shortening.  Bake 25 minutes or until edges are light golden brown.  Allow cakes to cool in pans for 10 minutes.  Transfer cakes to cooling racks.  Allow to cool completely before frosting.

Instructions for Frosting:

In a stand mixer fitted with the whisk attachment, whip the butter for 1 minute.  Add the powdered sugar 1 cup at a time.  Scrape the sides in between each addition.  Mix for 30 seconds between each sugar addition.  Add vanilla and buttermilk.  Mix on medium/high speed for 4-5 minutes.  Frosting will be light and creamy.  Chill in the refrigerator for 30 minutes before frosting your cake.  Whip once more before frosting cake.

Enjoy!  (Recipe Source:  WonkyWonderful)

Tawnya


Pizza Waffles

Sunday, November 6, 2016

img_2467

Remember when I confessed that I’m a bit of a snacker?  That was some time ago, but nothing has changed.  I still am. 🙂  If I keep finding recipes like this one, there will be no hope for me.  These Pizza Waffles are so much fun and super easy to make.  It just takes Pillsbury Grands, tasty fillings, and a waffle iron.  They are PERFECT for kids helping in the kitchen.  I think this is an “anything goes” type of snack, too.  I’m thinking you can fill these with whatever you’d like.  I’m sticking with pizza, though.  These were kind of fabulous!  I hope your weekend has been wonderful!

Pizza Waffles

Ingredients:

1 can (16.3 ounces) Pillsbury Grands Flaky Layers refrigerated biscuits
8 slices mozzarella cheese (sliced to fit)
1/3 cup mini pepperoni slices
2 cups pizza sauce

Instructions: 

Spray waffle iron with cooking spray; heat waffle iron.

Separate dough into 8 biscuits.  Cut slit on 1 side of each biscuit, forming a deep pocket.  Place 1 slice of cheese into each pocket.  Top cheese with 6 or 7 pepperoni slices.  (I added a little spoonful of pizza sauce, too.)  Press dough around edge to seal each biscuit.

Place one biscuit on center of waffle iron.  Close lid; cook 3 minutes or until waffle is golden brown.  Repeat with remaining filled biscuits.  Serve with pizza sauce.  Enjoy!

(Recipe Source:  Pillsbury.com)

Tawnya